Pipelines (Basic): Create & view
Our pipelines are not only an easy visual tool but also a fully customizable one, suited to your firm’s needs. Once you automate them, jobs move from stage to stage, automatically creating tasks and sending emails, proposals and organizers to clients at just the right time! Read on to find out more.
Covered here:
- Pipelines
- Using pipelines from the Marketplace
- Creating pipelines from scratch
- Viewing pipelines
- Viewing automations in pipelines
- Editing pipelines (add, move and delete stages and automations)
- Duplicating pipelines
- Deleting pipelines
- Adding jobs
- Viewing accounts added to pipelines

Webinar - Workflow automation: Optimize your internal processes! Tuesday, 1 pm EST. Register here
Pipelines
A pipeline is an established work procedure—a sequence of steps, or stages, involved in, say, preparing a 1040 form from beginning to end.
Our pipelines are designed to look like a kanban board. Jobs, displayed on cards, move from stage to stage on the board. And once automated, pipelines do much of the work for you!
What happens inside a pipeline:
- Jobs, the individual projects a client pays you for (such as a tax return or a January payroll), are introduced to a pipeline specifically designed for it. Each job, linked to a client account, moves through the pipeline from the first to the last stage, or completion.
- Stages are the steps in an overall work procedure. Once all the work involved in a stage is completed, a job moves to the next stage.
- Automations, the mechanisms that automate a pipeline, make things happen on their own. Once triggered, they create tasks for team members or send organizers and proposals to clients, for example.
Two pipeline examples:
Pipeline 1: 1040 return
Job 1: 2015 Tax return
Job 2: 2016 Tax return
Job 3: 2017 Tax return
Stage 1: Review docs
Stage 2: Prepare engagement letter
Stage 3: Prepare return
Stage 4: Review
Stage 5: E-file
Pipeline 2: Payroll
Job 1: 2015 January payroll
Job 2: 2016 February p ayroll
Job 3: 2017 March p ayroll
Stage 1: Review docs
Stage 2: Review timecards
Stage 3: Initiate debit
Stage 4: Send paystubs
Using pipelines from the Marketplace
You can download ready-made email templates with the best practices. They can be edited easily.

Tip: By installing a pipeline template you’ll also get all the templates inside it, such as for tasks, chats, emails, and so on.
To add a pipeline from the Marketplace:
1. Go to Templates > Marketplace from the left sidebar and open the Pipelines tab.

2. Click Get free on the template you want to add or click on its price and proceed with the payment if it's a paid template.
3. Go to Templates > Firm templates from the left menu bar, then select the Pipelines tab and click on the name of the template to review and edit stages and automations.
Would you like to share some of your pipeline templates with other TaxDome users? If so, you can sell them on the Marketplace!
Creating pipelines from scratch
A firm owner, admin or any team member with access rights to manage pipelines can create a pipeline.
Here’s how:
From Templates > Firm templates or Workflow, go to Pipelines, then click Create Pipeline.
See the instructions for each numbered field below:

1. Pipeline name: Enter a name for the pipeline; what you’ll see in the Workflow section.
2. Available to: Select the team members who need access to it. If you leave this empty, only the person creating the pipeline and the firm owner see it the Workflow section. For more, read about access to pipelines.
3. Sort jobs by: Decide how you want jobs to be sorted in the stages. By default, they’re sorted by account name, but you can also sort them by amount of time in a stage, due date, date a job was created, or priority.
4. Default job template: Decide whether a template should be applied to jobs entering the pipeline and how (automatically or manually).
5. Job card fields: Decide what you want to see displayed on job cards. Here's more on customizing job cards.
6. Recurrence: Schedule jobs that repeat to be automatically created inside the pipeline. Here's more about setting up a schedule for recurring jobs.
7. Stage name: Enter the name for the first stage.
8. Add stage: Add as many stages as needed and link automations to them.
9. Add automations: Link as many automations to stages as needed. Once a job moves to a new stage containing automations, those actions are automatically triggered one by one, in a specific order. For example, a task is created; an organizer is generated; an email is sent. Here is more on how automations work.
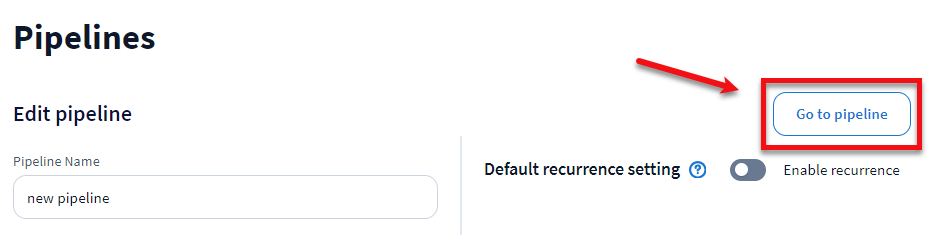
10. Save: Save the pipeline. Once you've done it, you can click on the Go to pipeline button and start adding jobs to it for your client accounts.
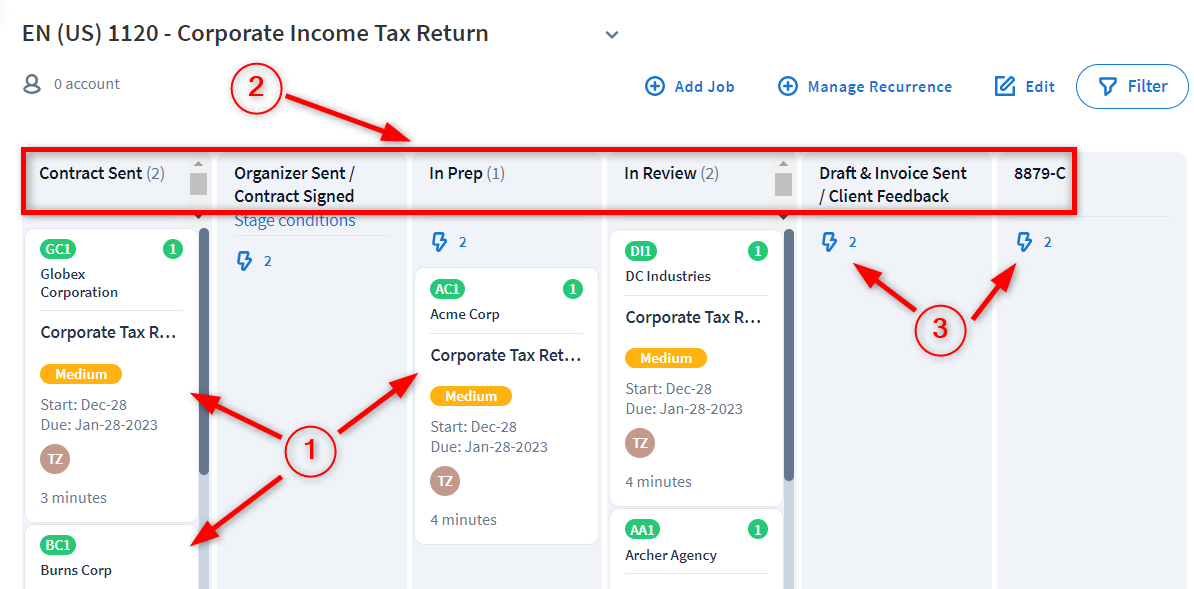
Viewing pipelines
View pipelines either for a single client account, for all accounts or those with recurrences:
- For one client account: Go to Clients > Accounts from the left menu bar, click on the account name, then select the Workflow tab. You’ll see all the pipelines with jobs for that client account and the progress made. Once a job has been completed and archived or deleted, it’s no longer visible. However, if the pipeline has no active jobs but the recurrence is set for that account, the pipeline will still be displayed on this page.

- For all client accounts: Go to Workflow > Pipelines from the left sidebar, then select the pipeline. To go to another pipeline, use the drop-down menu.

- With job recurrences: Navigate to Workflow > Job recurrences from the left menu bar to view and access pipelines for which recurrences are set.

Editing pipelines (add, move and delete stages and automations)
A firm owner, admin or team member with access rights to manage pipelines can edit a pipeline.
Here’s how:
- From the pipeline, click Edit on the top right of the page or click the automation icon below a stage name, then click the Add automation link.

- From the pipeline templates list, go to Templates > Firm templates from the left menu bar, select the Pipelines tab, then click on the name of the pipeline.
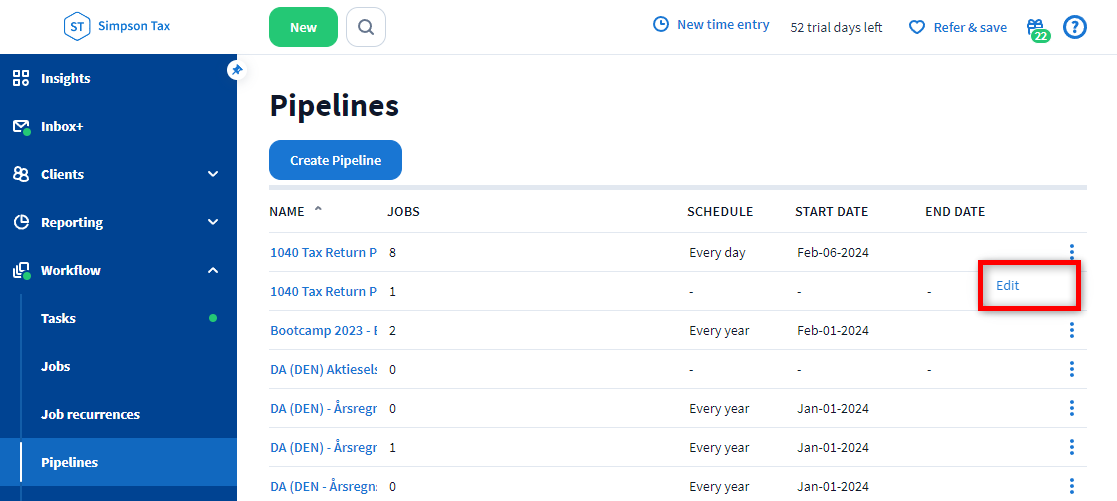
- From the pipeline list, go to Workflow > Pipelines from the left menu bar, click three dots to the far right of the name of the pipeline, then select Edit.
Once you are in the edit window, you can change the pipeline settings (see above for details) and make changes to the stages:
- To add a stage, click Add stage or the + button, then enter the name of the stage.
- To move a stage, point to the move icon to the left of the stage name, then drag-and-drop it.
- To delete a stage, click on the trash can icon to the right of the stage name.
- To add automation to a stage, select the stage, then click on the Add automations button or on any automation, if there is one already.
-
If you want additional emails to be sent to clients when they don’t respond within a certain time frame, locate Reminders below the automation template, then select Enable in the drop-down. Here's more on reminders.

Attention! When you delete a stage in a pipeline, all jobs at this stage will be deleted. Make sure that all the necessary information is saved to prevent data loss.
When you're done, click SAVE. After that, you can click on the Go to pipeline button to see your changes.
Duplicating pipelines
To create new pipelines based on existing ones, go to Templates > Firm templates from the left menu bar, select the Pipelines tab, click three dots to the far right of the name of the pipeline, then click Duplicate. A copy of the pipeline is saved with a suffix (e.g., 1040 Return (2)). Stages, automations and other template settings are copied as well. However, you’ll need to manually add jobs to a newly duplicated pipeline.

Deleting pipelines
To delete a pipeline, go to Templates > Firm templates from the left menu bar, select the Pipelines tab, click three dots to the far right of the pipeline and select Delete.

Note: This deletes all jobs linked to the pipeline.

Viewing accounts added to pipelines
To find out which accounts have been added to a specific pipeline or to a stage in a pipeline:
- Go to the Clients > Accounts or Workflow > Jobs from the left menu bar, then click on the FILTER button.
- Select a pipeline name in the Active jobs filter and select the stage. You can select several pipelines and stages if needed.
You’ll then see a list of all client accounts that were added to the selected pipeline and/or stage.
